Nursing school is hard. I dislike pre-planning, long classes, and not knowing what to do. Tests are amazingly difficult because you have to think differently...not the type of tests that I'm used to. Clinicals are terrifying, especially because you have to deal with someone's life. I'm just scared...of everything! :(
On the bright side, it's actually fun; especially when I get really cool patients! I just have to get past the initial terror of going into the hospital feeling unprepared. Clinical days are actually my only saving grace right now; my favorite day of the week (well...sort of, I actually like the days when I don't have any obligations except for studying). I guess it's not that bad. Only 2 1/2 more years left...
So we already finished all our skills that we can do! Patient care, vital signs, physical assessment, and administering meds. I gave oral meds the first day we could give them! It's actually a lot easier than what we did in skills lab. The week after (last week) I gave an SQ shot! It went surprisingly well...not as bad as I thought it would be! :D
Anyways, sorry that I'm not updating anymore. It's been really busy! I haven't baked anything in such a long time and I don't think I'll be able to until around Thanksgiving or after finals week! :(
Sunday, November 4, 2012
Saturday, October 6, 2012
Mini Cheesecakes

I haven't been able to write in awhile! Nor have I been able to actually cook anything...so sad. :/
Nursing school is very difficult! More difficult than I thought it would be! I need to study a lot...but I don't! My laziness has finally taken its toll! I always feel as though I am behind and I barely passed my first nursing exam! I can't wait for winter break already!
Laziness factor #1: SO MANY GOOD TV SHOWS show in the fall!
Switched at Birth
Go On
New Girl
Animal Practice
Glee!
The New Normal
Modern Family
The Mindy Project
Elementary
DWTS
Survivor
Ben and Kate
Parks and Recreation
Once Upon A Time
Guys With Kids
The Amazing Race
Touch
Community
Don't Trust the B in Apt 23
I know, I watch wayyy too much TV! I just can't cut it down! :/
These cheesecakes were from the wedding I catered for in August. I kind of burned some of them because I was in such a hurry. The ones that weren't burnt tasted great though!
If it's your first time making cheesecake, make sure that your cream cheese is at room temperature to prevent clumps.
Recipe from Allrecipes.
Mini Cheesecake Recipe:
Makes 12 Mini cheesecakes
Ingredients:
1 (8 ounce) package cream cheese
1/4 cup and 2 tbsp white sugar
1 egg
1/2 tsp vanilla extract
1/2 (21) oz can cherry pie filling
1 package (6 crackers) graham crackers
3 tbsp melted butter
- Preheat oven to 350 degrees F (175 degrees C). Line muffin tins with paper liners.
- Crush the graham crackers and mix with melted butter. Place around 1 tbsp of the graham cracker mix into each paper cup and press down to make the crust.
- In a mixing bowl, beat cream cheese, sugar, eggs and vanilla until light and fluffy. Fill each muffin liner with this mixture.
- Bake for 15 minutes. Cool. Top with cherry pie filling.
Friday, August 31, 2012
Pac-Man Body Pillowcase
Hello ya'll!
So this week was my first week of nursing school. It was a quite overwhelming. I only have classes 3 times a week but with the classes being around 2-3 hours a pop, it's very difficult to stay alert and to concentrate on the subject...especially when your stomach growls. Embarrassing!
Today, I feel kind of sad. I don't even know why! I'm thinking it's the pressure of nursing school but I also feel like it's something else. I just don't know what! :/ I hope it clears up soon! I have so much to read and so much to learn and relearn...I don't know how it's gonna fit in. My social life this week totally disappeared and I wasn't even as busy as I will be later.
All I can do is pray for the best!

Here I'd like to share with you a pillow I made for my best friend! I would only do this for her because she has helped me so much throughout our friendship and always encourages me to do my best. I made her a Pacman pillowcase! :D

I hand stitched the front of it. It took hours! But it looked very clean! Haha. (This was the unfinished version.) I used a sewing machine to sew the pillowcase together though.

It's funny how I made her this and I don't even have a proper cover for my own body pillow! Haha I think this looks really cool! The actual pillowcase is made of black flannel. The pacman parts are made of different color fleece.

I actually decided not to include the eyes in the finished product because they might come off during washing!

There it is! Haha. Sorry, not much of a tutorial or anything. Actually...just a story. Happy fall everyone!
Sunday, August 26, 2012
Mexican Wedding Cookies (Snowballs)

Oh no! I start classes tomorrow! I have so much to do and already got assigned 2 chapters for one of my textbooks and some videos! I decided to post one last blog before my life gets hectic (as if it already wasn't!) It'll be short and sweet!
Here's another recipe from the wedding I catered. It's Mexican wedding cookies, or snowballs, or Russian tea cakes!
They're really delicious! It contains pecans which gives it a great flavor. Make sure to roll it in the powder sugar twice so they look like snowballs! :D

Recipe from Allrecipes.
Mexican Wedding Cookies (Snowballs)
Yields 5 dozen
Ingredients:
1 cup butter
1/2 cup confectioners' sugar
1/4 teaspoon salt
1 teaspoon vanilla extract
2 1/4 cups all-purpose flour
1 cup chopped pecans
1/3 cup confectioners' sugar for decoration
Directions:
- Preheat oven to 350 degrees F (175 degrees C).
- Cream the butter with 1/2 cup of the confectioners' sugar and the vanilla. Mix in the flour, nuts and salt. Roll about 1 tablespoon or so of dough into balls and place on an ungreased cookie sheet.
- Bake at 350 degrees F (175 degrees C) for 15 minutes. Do not allow these cookies to get too brown. It's better to undercook them than to overcook them.
- While cookies are still hot roll them in confectioners' sugar. Once they have cooled roll them in confectioners' sugar once more.
Friday, August 24, 2012
Matcha Green Tea Macarons with Black Sesame Frosting

How many of you love the fair? Well, I'm nonchalant about it. Haha. Just the whole idea of deep fried food, meat lovers paradise, and crazy heart-attack concoctions makes me uneasy. Yes, I would like to try every single one of them. But NO! I don't want atherosclerosis and I absolutely don't want to pay $20 for a turkey leg wrapped in a 1 pound layer of bacon...but I did buy this blooming onion!

Over-exaggerating much? I think so! Fatty food is good on occasion! I actually LOVE carbs! Haha.
I also love llamas.

Why hello there, kind sir.
So I made for you guys something that you definitely won't find at the fair. This is actually my second attempt at making the famed macarons. Did they turn out okay...well, not exactly what I wanted but they were good enough. They were freaking delicious! Nomnomnom.
The macaron itself is a good recipe...the mistake on my part is that it would not dry at the top at all. I don't know if it's my house or something but I wait longer than an hour for it to barely be even close to drying on top. Something is wrong with me! :/

This is a different recipe from the first one I used, but here you go! Recipe from Sugar Puff Blog.
Green Tea Macarons:
Ingredients:
2/3 cup ground almonds
1 1/2 cup powdered sugar
3 egg whites
1/8 tsp cream of tartar
5 Tbsp granulated sugar
1 tsp vanilla
2 - 3 tsp matcha powder
- Sift together powdered sugar and almond, set aside
- Beat together egg whites and cream of tartar until foamy, turn the speed to high and gradually add in granulated sugar, one tablespoon at a time, until stiff peak forms and then add in vanilla extract and beat for another 15 seconds.
- Dump in all the almond mixture and mix with a spatula
- You don’t need to fold the batter super carefully, but you also don’t want to be too aggressive and definitely don’t want to over-mix it
- Pipe the batter on the baking pan. They do spread, so make sure you pipe them 1 inch apart from each other. For peaks, moisten your finger with water and press down gently to round them.
- Let the macarons dry in the pan at room temperature for about 20 - 45 minutes; depending on the weather. If your kitchen is humid, they might need longer time to dry. They’re ready to go into the oven when they don’t stick when touching.
- Preheat your oven to 280F
- When the surface of macarons are dry enough to touch, bake in the preheated oven for 15 - 18 minutes, or until macarons are hard enough to touch; they’re not done when it “sinks in.” Another way of checking the doneness of macaron shells is when you peel one off your baking sheet, it does not fall apart; it should come off easily.
Black Sesame Frosting:
1/2 cup softened unsalted butter
1 cup ground black sesame/black sesame powder
3/4 cup powdered sugar
Directions:
- In a bowl, cream together butter, sesame and sugar. Set aside until needed. If using butter, put in the fridge until needed.
Thursday, August 23, 2012
Frosted Sugar Cookies

Last week I catered sweets for a wedding. Woohoo! Weddings are so amazing. The brides are always gorgeous, the setting is always picture perfect, and the food is always great! Notice I have no mention of the groom!

Yes, the groom is very important! But as a spectator, there's more important things! Once I get to my wedding, I'll make sure that the groom is absolutely perfect! But for now, I like to look at the details!

Even though I'm kind of young, I actually have thought about my wedding a little. Definitely going to be outside and the reception will be outside/inside. Actually, that's all I thought about. I guess it's not as much as I thought!
I catered a lot of desserts...which will come in later posts. I think that the most amazing dessert I did though were these frosted sugar cookies. I made them to look like a wedding dress and a tuxedo!

Cute right?
It was actually my first time making sugar cookies and my first time frosting sugar cookies! I'd say it turned out exceptionally well for the most part. As a perfectionist, I think they're incredibly sloppy...although the general public seemed to differ.

These cookies were very simple. I didn't include to many intricate designs or anything because I was short on time! Plus, I wasn't getting paid for this! All for fun eh?!

Sugar Cookie Recipe: Recipe from Allrecipes.
Makes about 60 rolled cookies
Ingredients:
1 1/2 cups butter, softened
2 cups white sugar
4 eggs
1 teaspoon vanilla extract
5 cups all-purpose flour
2 teaspoons baking powder
1 teaspoon salt
Directions:
- In a large bowl, cream together butter and sugar until smooth. Beat in eggs and vanilla. Stir in the flour, baking powder, and salt. Cover, and chill dough for at least one hour (or overnight).
- Preheat oven to 400 degrees F (200 degrees C). Roll out dough on floured surface 1/4 to 1/2 inch thick. Cut into shapes with any cookie cutter. Place cookies 1 inch apart on ungreased cookie sheets.
- Bake 6 to 8 minutes in preheated oven. Cool completely.
Sugar Cookie Frosting: Recipe from Allrecipes.
Makes around 12 cookies worth
Ingredients:
1 cup confectioners' sugar
2 teaspoons milk
2 teaspoons light corn syrup
1/4 teaspoon almond extract
assorted food coloring
Directions:
- In a small bowl, stir together confectioners' sugar and milk until smooth. Beat in corn syrup and almond extract until icing is smooth and glossy. If icing is too thick, add more milk.
- Divide into separate bowls, and add food colorings to each to desired intensity. Dip cookies, or paint them with a brush.
Tuesday, August 14, 2012
Garlic and Cilantro Naan
Have any of you gotten your wisdom teeth pulled? I just got all 4 of mines out. They had to put me under sedation/anesthesia because one of my teeth was sitting right on top of my nerve. They even had to go as far as leave a bit of the tooth in there so that my nerve could be protected.

I kinda wanna know what nerve it was. Trigeminal, Facial, or Glossopharyngeal....ahhhh I'm just going to believe it's the facial nerve for now. Haha, curse me for forgetting my basic anatomy! I wonder when I can brush my teeth...
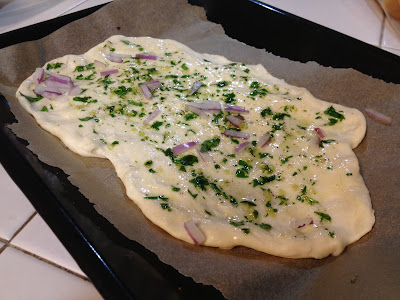
So this naan...I made awhile ago. I would be crazy to make it now since I can't chew a bit! If you don't already know, naan is a type of Indian bread that is normally cooked in a tandoor oven. This is why sometimes you find packages of it labeled tandoori naan! Versions vary drastically and I'm the type of person that likes things plain, so this was a bit of a leap for me.

I would recommend adding more garlic depending on the type of flavor you want. Stronger = more! I added red onions to the recipe because I had some on hand.

Garlic and Cilantro Naan:
Makes around 3 large Naan breads
Ingredients:
2 cups flour
½ tsp salt
2 tbsp plain yogurt
1 tbsp oil
3/4 cup lukewarm water
1/2 tbsp yeast
1/2 tbsp sugar
3 tbsp melted butter
3 cloves garlic, minced
1/4 cup chopped cilantro
Directions:
- Proof the yeast: Mix the lukewarm warm, yeast and sugar together until combined in a bowl. Set it aside until it turn frothy.
- In another bowl, mix dry ingredients flour and salt together. Add in the yogurt and oil, and then the yeast mixture. Mix until combined. Turn the dough into working table and knead until elastic and smooth.
- Cover with plastic wrap and set it aside to proof until double its size.
- In the meantime mix the butter, minced garlic, and chopped cilantro together. Set it aside.
- Line a baking sheet pan with aluminum foil or parchment paper (I like the latter). Pre-heat oven to 400F. Place your baking sheet in the oven.
- Divide the dough to 3 large portions. Roll the dough out to an oval shape. (Instead of rolling I just used my hand.)
- Put some olive oil on your pan to prevent sticking if using foil. Put the roll out dough onto the sheet and brush it with the garlic and cilantro mixture. Bake in the oven until golden brown.
Monday, August 6, 2012
Chocolate Mocha Coconut Cake with Coconut and Chocolate Buttercream (Portal Cake)

How has your summer been? I'm sad because mines' almost over. Just a couple more weeks then I have to start school again! Anyways, I have very good news to share with all of you!
I just got into the nursing program at my university! No more being unsure! No more having to worry about my future! It's literally in my hands now. With that feeling aside, I know I won't be able to bake as much anymore. It's upsetting, but I have to do what I have to do right? Sacrifices must be made! Feelings must be hurt! People must be pushed aside!
Ugh, the reality of it all is truly daunting.


I made a chocolate mocha coconut cake for the portal cake. The layers in between are coconut buttercream and the outside layer is composed of regular chocolate buttercream. After I put the layer of chocolate buttercream, I used cut chocolate to make the rugged design on the outside. In place of whip cream, I used standard vanilla buttercream on the top of the cake! Maraschino cherries go on top of it.
For the portal cake, you need:
4 oz semi-sweet baking chocolate shaved/broken or chocolate shavings
8 maraschino cherries
Whip cream or white frosting
*Refer to here for assembly.

Original recipe from The Heritage Cook.
Chocolate Mocha Coconut Cake:
For a 2 layer cake (8 in)
Ingredients:
2 eggs
1 1/4 cup granulated sugar
1 can coconut milk
1/2 cup vegetable oil
4 tsp vanilla extract
2 1/4 cups all-purpose flour
1/2 cup dark cocoa powder
6 tbsp instant coffee powder or espresso powder
2 1/2 tsp baking soda
1 tsp salt
4 tbsp sour cream
Extra butter and flour to coat pans
Directions:

Chocolate Buttercream:
Yields around 3 cups - Recipe from Savory Sweet LifeDirections:
- Preheat oven to 350°F.
- In a large mixing bowl, whisk egg and sugar until smooth and no lumps remain. Add milk, butter and vanilla, and mix until combined.
- Sift dry ingredients together in another bowl and add to wet mixture. Mix until batter is smooth, and then stir in sour cream.
- Coat pans with butter, then sift extra flour on top. Discard any excess flour from the pan. Distribute cake batter into both pans so that they have around the same amount. Bake for around 25 minutes or until toothpick comes out clean.

Ingredients:
1 cup unsalted butter (2 sticks or 1/2 pound), softened
3 to 3 1/3 cups confectioners (powdered) sugar
1/2 cup cocoa powder
1/2 teaspoon table salt
2 teaspoons vanilla extract
4 tablespoons milk
1 cup unsalted butter (2 sticks or 1/2 pound), softened
3 to 3 1/3 cups confectioners (powdered) sugar
1/2 cup cocoa powder
1/2 teaspoon table salt
2 teaspoons vanilla extract
4 tablespoons milk
Instructions:
- Cream butter for a few minutes in a mixer on medium speed.
- Turn off the mixer.
- Sift 3 cups powdered sugar and cocoa into the mixing bowl.
- Turn your mixer on the lowest speed until the sugar and cocoa are absorbed by the butter.
- Increase mixer speed to medium and add vanilla extract, salt, and milk and beat for 3 minutes. If your frosting needs a more stiff consistency, add a little more sugar. If your frosting needs to be thinned out, add additional milk 1 tablespoon at a time.
Coconut Buttercream:
Yields around 3 cups
2 sticks (1 cup) butter, softened
3 to 3 1/3 cups powdered sugar or more if needed
Pinch kosher salt
1 tsp vanilla extract
1 to 2 tsp coconut extract
1 to 3 tbsp of coconut milk or regular milk, or as needed
1/2 cup shredded unsweetened coconut
- Cream butter in the bowl of an electric mixture until completely smooth and creamy. With the mixer on low speed, slowly add in powdered sugar. Gradually increase mixer speed and add salt, vanilla, and coconut extracts. Beat for 2 to 3 minutes, scraping down sides and bottom of the bowl occasionally. Continue to whip for another 4 to 5 minutes, scraping sides and bottom of bowl as needed.
- If frosting is too thick, add coconut milk, 1 tsp at a time until desired consistency is reached. If it’s too thin, add powdered sugar gradually until it thickens.
- Fold in shredded coconut and mix until just combined.
Saturday, July 21, 2012
Cream Puffs with Vanilla Custard


The only downside?? Parking! No expecting free parking here! When you go to LA, be prepared to pay for parking wherever you go!
 |
| Bradbury Building Inside |
We ended the day at Griffith Observatory, which overlooks all of LA and the cities that surround it. It also gives a great view of the Hollywood sign.
 |
| Griffith Observatory at Night |
LA is a great city! It's full of history and beautiful architecture! Definitely more than just glitz and glam!

Anyways, I made these amazing cream puffs, aka profiteroles...or choux (choux à la crème if with cream filling). Cream puffs are made with choux pastry, the same type of pastry used in eclairs. It is first cooked on the stove, then baked in an oven. The cream puffs become hollow on the inside while baking. They can be filled with just about anything, from cream to ganache to fresh fruit.

First you cook the butter, water, and flour on the stove. The next step is to add the eggs. While making the cream puffs, it is important to let the pastry cool before adding the eggs to ensure that the eggs wont start to cook. It is also important that a few minutes before baking ends, that you poke holes at the top of the cream puffs and lower the oven temperature a little! My first batch sank like a bad game of battleship!
For the custard, I actually used a double boiling in place of the actual saucepan. It takes a bit longer, but it's a lot easier to make sure that it won't burn!
Cream puff recipe from Joy of Baking. Vanilla custard recipe from Epicurious.

Cream Puffs:
Makes about 12 small cream puffs.
1/2 cup all purpose flour
1/2 teaspoon granulated white sugar
1/4 teaspoon salt
1/4 cup unsalted butter, cut into pieces
1/2 cup water
2 large eggs, lightly beaten
Directions:
- Preheat oven to 400 degrees F.
- In a large pot, bring water and butter to a boil. Stir in flour, sugar, and salt until the mixture forms a ball. Transfer the dough to a large mixing bowl and cool.
- Beat in the eggs one at a time, mixing well after each. Drop by tablespoonfuls onto an ungreased baking sheet.
- Bake for 15 minutes in the preheated oven, then decrease temperature to 350 degrees. Poke a hole in the pastry with a toothpick. Continue to bake until golden brown. Centers should be dry.
- When the shells are cool split and fill them.

Vanilla Custard:
Makes about 2 cups of custard.
Ingredients:
1 1/2 cups whole milk4 large egg yolks
1/3 cup sugar
2 tbsp cornstarch
1/8 teaspoon salt
1/2 tablespoon unsalted butter, softened
1/2 teaspoon vanilla
Directions:
- Heat milk in a saucepan over moderate heat until hot but not boiling.
- While milk heats, whisk together yolks, sugar, cornstarch, and salt in a heatproof bowl until smooth.
- Add 1 cup hot milk to yolk mixture in a stream, whisking, then add remaining milk, whisking constantly. Transfer mixture to saucepan and cook over moderately low heat, stirring constantly, until thickened and registers 170°F on thermometer, 6 to 10 minutes (do not boil).
- Immediately force custard through a fine-mesh sieve into a clean bowl and stir in butter and vanilla.
- Chill custard, its surface covered with wax paper, until cold and thickened, at least 3 hours.
Monday, July 16, 2012
Sweet Cornbread
 |
| Sweet Cornbread |
Hello! This weekend, my cousins and I took a road trip to Sequoia National Park. We first stopped at Solvang, which is a little Danish town located in Santa Barbara county.

If you have never been to Europe, this town is definitely something you should see! It has the feeling of being in a small town, despite the numerous tourists roaming around. As for the architecture, it's just amazing. Everything is built in traditional Danish style, with different colors all around. It kind of reminded me of far far away land from Shrek. One thing that most people try when they go there are Aebleskivers, which are small pancake balls that are covered in jam and sugar.
After we went to Sequoia! I'm not much of a tree and nature person, so I wasn't that amazed. They had gigantic trees (width)...but no matter how big the tree is, it's just a tree to me. Sorry! :(

But it was still fun! I really enjoyed the scenery, I just didn't like the heat!
So let's talk cornbread! I love cornbread! Especially the ones with corn in them! So that's what I did! I've never made cornbread from scratch before so this was new to me.

Pretty good though if I say so myself. I substituted brown sugar in place of the white sugar, which made a darker hue. Original recipe adapted from here.

Sweet Cornbread:
Ingredients:
1/2 cup butter
2/3 cup white sugar
1/2 cup all-purpose flour
1/2 cup corn flour
1 cup cornmeal
1/2 teaspoon salt
1/2 teaspoon baking soda
2 eggs
1 cup milk
Directions:
1 cup cornmeal
1/2 teaspoon salt
1/2 teaspoon baking soda
2 eggs
1 cup milk
Directions:
- Preheat oven to 375 degrees F (175 degrees C). Grease an 8 inch square pan.
- Melt butter in large skillet. Remove from heat and stir in sugar. Quickly add eggs and beat until well blended. Combine buttermilk with baking soda and stir into mixture in pan. Stir in cornmeal, flour, and salt until well blended and few lumps remain. Pour batter into the prepared pan.
- Bake in the preheated oven for 30 to 40 minutes, or until a toothpick inserted in the center comes out clean.
Thursday, July 12, 2012
Chocoflan
 |
| Chocoflan! |
 |
| Divergent, Insurgent by Veronica Roth |
-001.JPG) |
| Veronica Roth at her Dark Days Tour |

The cool thing about this dessert is the magic that happens when you bake it! When assembling, the layers go like this: caramel sauce, chocolate cake, flan. After it's done baking: caramel sauce, flan, chocolate cake! The flan and the chocolate cake switch spots! Amazing! See! It's magic!
Not really...it's actually because the flan is more dense than the cake, causing them to invert places. Another example of this is when you place oil in water or a pool noodle in water, they always float to the top. I think I have never been more excited to make a cake before. The whole time I was giggling, I bet you will too!
 |
| Inside the Chocoflan! |
This is definitely something I would make again and again! Make sure to let it cool down completely before taking it out of the bundt pan! I wasn't able to and the flan kind of sank a little bit on the sides. Also, make sure the cream cheese is at room temperature. It must be soft or else it will not blend into the flan mixture, leaving glops of it behind. If you do, just simply strain the mixture and add more lost cream cheese.
I used dulce de leche as the caramel sauce for my cake. I made it from one 14oz can of condensed milk. I was short on time so I made it the quick way, by microwave.
Recipe from Marcela Valladolid's Mexican Made Easy.

Chocoflan:
Makes about 12 servings
Ingredients:
12-cup capacity Bundt pan
Softened butter, to coat pan
1/4 cup cajeta or caramel sauce
For the cake:
10 tablespoons butter, room temperature
1 cup sugar
1 egg, room temperature
1 3/4 cups all-purpose flour
3/4 teaspoon baking powder
3/4 teaspoon baking soda
1/3 cup cocoa powder
1 1/4 cups buttermilk
For the flan:
1 (12-ounce) can evaporated milk
1 (14-ounce) can sweetened condensed milk
4 ounces cream cheese, room temperature
3 eggs
1 tablespoon vanilla extract
For the garnish:
1/4 cup cajeta or caramel sauce
1/4 cup cajeta or caramel sauce
Directions:
- Put an oven rack in the middle of the oven and preheat to 350 degrees F.
- Coat a Bundt pan with a little butter, then coat the bottom with 1/4 cup cajeta and put it in a large roasting pan. (The roasting pan will serve as a water bath during baking.)
- For the cake: Add the butter and sugar to a bowl and using an electric hand mixer or stand mixer, beat until light and fluffy, then beat in the egg. Sift together the flour, baking powder, baking soda and cocoa in a medium bowl. Beat 1/3 of the flour mixture, and 1/2 of the buttermilk into the egg mixture. Repeat, ending with the flour mixture. Blend until well incorporated.
- For the flan: In a blender, combine the evaporated milk, condensed milk, cream cheese, eggs and vanilla. Blend on high for 30 seconds.
- Scoop the cake batter into the prepared Bundt pan and spreading evenly. Slowly pour the flan mixture over the cake batter. Cover with foil and add about 1-inch of hot water to the roasting pan.
- Carefully slide the pan into the oven, and bake 1 hour, until the surface of the cake is firm to the touch, or an inserted toothpick comes out clean. When cake is done, remove from the water bath and cool completely to room temperature, about 1 hour.
- Invert a large, rimmed serving platter over the Bundt pan, grasp tightly together, giggle a little and flip over. Remove the pan and scrape any remaining cajeta from the pan onto the cake and serve!
Hmmm...Everytime I look at my pictures, I want a new camera! Point and shoots. Or I should take pictures during the day in natural light. Haha.
Monday, July 9, 2012
Simple Guacamole
Have any of you had a song that hits you so bad you start crying? A song that makes your heart melt over and over and you can't do anything about it because every time it plays you think of your past. A song that brings back the bad memories and puts it all into a few simple lyrics but explains the situation perfectly?
Well I do. It's Miss Invisible by Marie Digby.
Always brings me back to my horrible lonely past. I'm just glad that I'm not that person anymore. Finally broke out of my sad shell. I remember when I first heard it, I had to keep listening to it to register what the words meant in my silly mind. Then I knew. Every time I hear it I feel like I stepped on a time bomb that's been ready to explode. But I'm really glad that I went through that. There's always a time in your life that you feel like you hit rock bottom. The only thing to do is get back up at try your best to climb. I wouldn't be the person I am today if bad things didn't happen to me. The best you can do is be ready for it when it comes.

On a lighter note, let's talk Guacamole. I always thought that was a fun word to say. I've only eaten guacamole when I got the vegetarian at Chipotle since it comes with it and at a couple Mexican restaurants. This guacamole recipe is excellent and very simple. Definitely something I would keep making, especially for 7 layer dips!

I used Alton Brown's recipe! The only complaint is that the lime may be a bit overpowering. Watch how much you put in and alter it to your liking.
Guacamole:
Ingredients:
3 Haas avocados, halved, seeded and peeled
1 lime, juiced
1/2 teaspoon kosher salt
1/2 teaspoon ground cumin
1/2 teaspoon cayenne
1/2 medium onion, diced
2 Roma tomatoes, seeded and diced
1 tablespoon chopped cilantro
1 clove garlic, minced
Directions:
In a large bowl place the scooped avocado pulp and lime juice, toss to coat. Drain, and reserve the lime juice, after all of the avocados have been coated. Using a potato masher add the salt, cumin, and cayenne and mash. Then, fold in the onions, tomatoes, cilantro, and garlic. Add 1 tablespoon of the reserved lime juice. Let sit at room temperature for 1 hour and then serve.

Saturday, July 7, 2012
Lamb Stew with Dried Plums - The Hunger Games
 |
| Katniss' Favorite Lamb Stew with Dried Plums |

Our neighbors have a small get-together though. It was really amazing once everyone started lighting their own fireworks. Most of my neighbors had aerials! (Surprising because you can't buy them here). It was super pretty being under those! :)

So I made lamb stew Hunger Games style! This is Katniss' favorite lamb stew. It's the stew that she loved eating in the Capitol and that was sent to her by Haymitch during the games. It's also what she says she was most impressed by about the Capitol during her interviews before the games.
It was a bit sweet for my tastes, even with the cut-down of sugar, but still good. I'm not much of a lamb person though, too game-y. I doubt i'll be making this again unless I find myself having a Hunger Games themed party. Hah.
Katniss' Favorite Lamb Stew with Dried Plums:
Yield 8-10 servings
Recipe Adapted from The Hunger Games Cookbook by Emily Baines.
Katniss' Favorite Lamb Stew with Dried Plums:
Yield 8-10 servings
Ingredients:
5 pounds lamb fillet, shoulder or leg, cut into 2-inch pieces
2 teaspoons salt
½ teaspoon ground black pepper
½ cup all-purpose flour
2 tablespoons olive oil
3 cloves garlic, minced
1 large onion, chopped
½ cup water
4 cups beef stock
1 teaspoons brown sugar
3 cups diced carrots
1 cup diced zucchini
1½ cups diced celery
2 large onions, diced
3 potatoes, cubed
2 cups halved dried plums
2 teaspoons dried thyme
3 teaspoons chopped fresh rosemary
2 teaspoons chopped fresh basil
1 teaspoon chopped fresh parsley
2 bay leaves
1 cup ginger ale
Directions:
- Place lamb, salt, pepper, and flour in a large mixing bowl. Toss to coat meat evenly.
- Heat olive oil in a large pan and brown the meat, working in batches if you have to.
- Remove lamb to a side plate. Pour off fat, leaving ¼ cup in the pan. Add the garlic and onion and sauté until the onion becomes golden. Deglaze frying pan with the ½ cup water, taking care to scrape the bottom of the pan to stir up all of the tasty bits of meat and onion. Cook to reduce liquid slightly, then remove from heat.
- Place the lamb and garlic-onion mixture in a large stockpot. Add beef stock and sugar, stirring until sugars are dissolved. Bring mixture to a boil, cover, and simmer for 1½ hours.
- Add the vegetables, dried plums, herbs, and ginger ale to the pot. Simmer for 30-45 minutes, or until meat and vegetables pierce easily with a fork.
Subscribe to:
Comments (Atom)